
Adam Monk Photo Tours & Images Gallery
We make Dreams come true.
Come with us to explore the almost limitless possibilities of the world of photography. To wonder, to learn, to be inspired, to create images you have only dreamed of with Photo tours to some of the worlds most amazing places with your guide and mentor Adam Monk.
Latest Photo Tours – Come explore the world with us.

Japan Winter Wonderland
Wildlife & Snowy Landscapes
Feb 20-Mar 03, 2027
Fully Booked for 2027

Karijini Gorges
Landscapes like no other
Next Tour 2027
details coming soon

Japan Autumn Colour
More than Just Autumn Colour
Next Tour 2027
details soon
Photographic Technique

Technical Information

617 transparencies on a lightbox with my hand for scale
All my images are printed using leading edge digital technology; the original image however is shot on film, at least for now. For this I use a selection of large format panoramic cameras, mainly the Fuji GX617 (see a review of the Fuji GX617 here). The 6×17 denotes the negative (positive actually) size in cm, 6cm high x 17cm long, that’s dramatically bigger than a standard 35mm negative, in fact 11 times the area. That greatly enlarged image area combined with a fine grain high colour saturation film (Fuji Velvia) creates an image of superb detail that can be enlarged to enormous proportions without going soft or blurry.
So why Digital, and is there a difference between digital printing and digital manipulation?

Fuji GX617 with a 35mm film canister to show the size
Photographic Printing
Digital printing is making use of advancing technology, it now offers a quality surpassing older traditional techniques with many added advantages.
Traditional Process
With a traditional process the photographic image is projected with an Enlarger onto light sensitive paper by shining a light through the transparency and focusing it with a lens, in fact a camera in reverse. The printer, a highly skilled technician, then adjusts various aspects of the image such as contrast, colour balance and density using a combination of lens tuning, coloured filters and exposure time. He/She also lightens areas that are too dark and darkens highlights that are too bright to bring the image into balance, this is the traditional printing method, not digital, and I spent many years working in printing labs doing exactly this. These procedures are to compensate for the fact that film has a much shorter contrast scale than your eye and the printing paper has one even shorter still, so some manual manipulation is required to bring the shadows and highlights back into balance. There is nothing worse than an image with all the shadows running to black and all the highlights burning out to paper white.
Repeatability
One of the essential problems with this kind of printing is the repeatability of the printed images. The results are very much subject to how much sleep the printing lab technician had the night before, what kind of day they’re having and the mood they are in. The results can vary to such a degree that it’s sometimes difficult to pick them as the same photo! This really becomes a problem when somebody sees an image on the wall and orders a print a different size or on a different media type, sometimes it takes 4 or 6 print attempts to get the image right. This is further exacerbated the bigger the image gets, due to the difficulty in handling huge pieces of photographic paper in the dark, and the light fall off as the distance between the enlarger and the paper platform grows. Printing huge images in a traditional darkroom with light sensitive paper really is a nightmare, in fact, prior to the advent of digital printers it was very rare indeed to see a 2m photograph, whereas i regularly print images that big and often much bigger.

A 617 transparency being scanned on the 848 scanner
Digital Printing
The difference for me with digital printing is to add a step in-between the film and the paper image by scanning the 6×17 transparency into a very high-resolution digital file (980mb to begin with, a finished image will end up about 2.9Gb) on a high end Imacon 848 film scanner. All colour balancing contrast and densities are then handled digitally, the same processes as the manual darkroom but done using Photoshop and a high end computer (a Mac of course) with a colour-calibrated screen. Once the file is complete to my my satisfaction, i would then save the layered image into an archive and then flatten, resize and sharpen a version to be sent to the printer, usually as a smaller test print first for a hard copy confirmation. I have had various large format digital printers over the years, from an Epson 4000, to an Epson 7600, an Epson 9600 and now the latest model Epson 9900 (as of December 2010). These are technically inkjet printers, though that is a bit like calling a formula One race car simply “a car”. The Epson 9900 uses an inkset of 11 colours, including 3 varying shades of black (grey really), each ink cartridge contains 750Ml of pure pigment based ink and a full set of inks currently costs AU$4,000.

Epson 9900 in action. Image is 1m wide
Contrary to a popular belief, the process of colour correcting an image digitally is not easy, nor is it fake. The job of digital technician is easily as skilled and demanding as a darkroom technician. In fact I would say considerably more so, speaking from the experience of having done both extensively.
I do all the digital colour correction of my own images and when out shooting I will spend many hours, sometimes days, waiting for the perfect light. I spend many months every year getting to these beautiful places and I spend many hours and many miles of walking finding just the right spot that conveys just the right feel so that the final photo will carry just the right impact. When I return I will then spend many more hours in front of the computer to ensure that what you see is exactly as it should be, every time.
Digital Manipulation?
So how then does this differ from digital manipulation? Definitions can be a little tricky, but lets say digital manipulation is the fundamental altering of a photographic image such that the final result does not truly reflect the original state, i think thats a pretty fair summary. We’ve all seen it or read about it in one form or another. An easy example is the fashion industry where models can be made to look slimmer, curvier, longer legs, bigger breasts even different coloured eyes! Yes that is all possible, but is it necessary or even desirable?
Thankfully I need to do none of that, nature is amazing enough just as it is. You just have to stop and look sometimes, look a different way. Stick around a bit longer wait for that special time of day, take a deep breath and open your eyes a bit wider. Get up earlier when it’s still cold and a little bit dark. Or stay till after the sun has set for the magic of twilight, the magic of the pre-dawn. At these times of day the light is soft, it allows the subtle colours to come through, the colours that are normally swept away by the intensity of sunlight. Then all you have to do is stand in the right place, point the camera the right way, don’t forget to focus- and push the button. Let God do the rest, whatever God you believe in, you want to see proof, watch a sunset in the Kimberley!

Sunrise on the Pentecost River in the Kimberley
I don’t create the scenes you see here, I only record them. I couldn’t possibly take the credit for something so awesome and overpoweringly amazing. Something that has been millions of years in the making, that would be ridiculous. The art of photography, my job, is to be able to see the infinite of nature and translate it to the finite of a photograph and still transmit the splendour of the original, to create a window out of a fragment that contains the essence of the whole.
Long Exposure Techniques
Many of my images are made using long exposure photography. That is leaving the shutter open for long periods sometimes hours at a time. I’ve been told on several occasions that this in fact is image manipulation because the result doesn’t truly reflect the original! I would argue that this is not the case; in fact the opposite is true. Long exposure photography more truly reflects the reality than an instant snapshot. These are not still life images, bowls of fruit on a table. Nature is fundamentally dynamic, it is constantly moving. Wind blows through the branches of the trees rustling the leaves, clouds skate across the sky, water flows ever downwards, oceans are never still even on the most tranquil day. I would say that an image that stops all this is more of a manipulation than the one that allows the flow of nature to be visible. Perhaps it’s not the way you are used to seeing it? Take another look, if I can help you see things a different way, a new way then I’ve achieved my goal.
Photography as Art

The art of nature
What is Art?
Before we look at Photography specifically, I think it would be useful to define what actually is art
This definition will always be very subjective and personal, something I consider art you may think is rubbish and vice versa… It’s usually like that, very black and white, you love or you hate it. And perhaps that’s the answer to the question anyway, art is something that provokes an emotional reaction within us…? But is that all it is? Is the guy next door filling his bin with last nights bottles next to your bedroom window at 6.30am on a Sunday art? That certainly evokes an emotional reaction. OK, so it must be more than that. Is it a skill or an ability that is beyond most of our abilities applied in some creative and innovative manner? Perhaps that’s closer, especially when you combine it with the first definition. A skill or ability beyond the normal applied in a creative and innovative manner that evokes an emotional reaction. Or does it simply come down to something that resonates with something in the viewer/listener/audience, something that captivates.
But can Photography be art?
So much for definitions, art, I think, defies a simple definition, it is elusive. So lets try to apply it to photography, can it be an art? This has been argued since the first days of photography, and is especially relevant today with the arrival of the digital age. But does owning a camera make you a photographer? Does owning a paint brush make you a painter? Am I just being pedantic? I don’t think so, this is the type of thing I have heard, “I know where that spot is, I’ll go and take it for myself… why should I buy one of yours?” So how do I respond to that? Well, OK, Good luck. I certainly didn’t make the scene I photographed, so I have no rights over the location.
So what exactly is it I am I selling when I sell a Photograph? Certainly not the piece of paper the image is printed on, not even the hourly rate for my time to take the image in the first place, I’m selling the emotion and the feelings that image evokes in you when you look into it.
I think the art of photography, specifically landscape (though I think this can be generally applied), is to stand in a place, breath in the ambience, the feel, the beauty, the whole essence and distil that into one image that conveys the feeling of being there.
Because after all, the beauty of being in a forest is not just the colour of the leaves. It’s all around you, the height of the trees, their majesty and sheer grandeur, the earth under your feet, the wind in the leaves. The sounds the smells, the whole feeling. That can be applied to all types of landscape images, the feeling you get from being there is not just coming in through your eyes, it’s a whole body and soul experience.

Feeling the wind in the leaves
Thats Not it at all…
Have you ever got your photos back from one of those amazing places you’ve been to, and thought… “Oh, that’s not it at all…” How many times have you heard… “It was much more amazing than the photos look…”
I often get asked, “what do you think I did wrong here?” Well the answer in a nutshell is, the camera was pointed the wrong way. The camera doesn’t feel what you feel, it cant, it’s an inanimate tool, a highly sophisticated hammer, you have to direct it to hammer in the nails.
When I am in one of these amazing places I will routinely stay for hours or even days, without even taking the camera out of the bag, not looking for angles, just getting to know the place, how it feels, its moods, how it makes me feel. What is it about this place that makes it special? Rarely is there a simple straight forward answer to that question, rarely is it right in front of me. Though you may get the feeling from where you are standing, that doesn’t mean the shot from that spot will transmit the feeling.
Sometimes it’s only a matter of a metre or two to one side or the other, or a little higher or lower. Sometimes it’s shooting in the opposite direction. It’s all about creating the window that allows you to see into the whole space and the feeling that space gave you. Even more important, it’s about transmitting that feeling to somebody who has never been there
So, I would consider that photography can be art, just like painting can be art. But, just like painting, it is not necessarily so. Owning a camera doesn’t make one an artist any more than owning a paintbrush does. Am I an artist, is what I do art? That’s up to you to decide…
Large Format Cameras
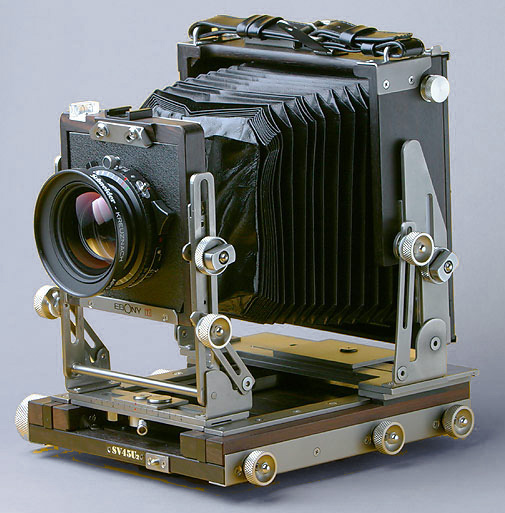
Example of a Large Format Camera, The Ebony
What is Large Format?
Strictly speaking, large format refers to a film size of 5 x 4 inches or bigger, such as 5″x 7″ or even the huge 8″x 10″ (that’s in inches!). Panoramic 6x17cm also falls into this class as large format because, although it uses medium format film (120 or 220 roll film), it uses a big slice at a time, 17cm in fact. Making it the same length as a piece of 5″x 7″ film.
All this is technical; the reality for the viewer is amazing clarity of colour, depth and sharpness, even when enlarged to enormous proportions!
This is due to the large area of film used for each shot, more than 11 times greater than a standard 35mm negative… for example, a print 1m long from a 35mm negative is enlarged 28 times from the original, whereas a 6×17 only needs to be enlarged 5.8 times to achieve the same result… in reality a 35mm negative runs out of steam at about A3, the film grain becomes very prominent and the image becomes fuzzy. At that size the 6×17 is just starting, that’s hardly an enlargement at all! So, as you can imagine, the potential is huge! (See a review of the Fuji 617 cameras here)

Fuji GX617 and the older fixed lens model Fuji G617
Medium Format Cameras
Medium formats are usually considered to be the ranges of 645 (6cm x 4.5cm), 6×6 (6cm x 6cm), 6×7 (6cm x 7cm) or 6×9 (6cm x 9cm). These formats were always the choice when dramatically higher image quality was required but without the bulk and difficulty of using a large format camera. Most medium format cameras are able to be used hand held, and some of them even take the form of large SLR formats, like a big 35mm camera (the famous Pentax 6×7). These medium format cameras take 120 or 220 roll film with the ease of use that comes with roll film, rather than loading double dark slides for each exposure as with large format cameras.

Fuji GX617 with 35mm film canister for comparison
Digital Medium Format
All these parameters changed with the advent of Digital cameras. The first digital cameras were prohibitively expensive, slow and of very low quality, but since then they have caught up and overtaken film as the premium choice, both for quality and convenience. The current range of professional and semi professional DSLRs, such as the Canon 5D Mk II, are capable of shooting images of medium format quality and beyond, while the more expensive medium format backs, such as the Phase One Camera and the Hasselblad, exceed even 4″x5″ film quality. Due to the clean grainless nature of Digital capture, digital images are able to be enlarged many times over with little degradation of image quality and sharpness, assuming of course the necessary ingredients are there in the first place. ie: correct exposure, image sharpness, lens and camera quality.

A Classic Medium format camera, the Bronica
Digital Vs Film
I have heard it said many times that the clean grainless look of a digital image looks somehow fake or unrealistic, but i think this is just habit. We are used to seeing photographic images with grain, it has become normal, and the grainless look of digital is still quite new. But where to from here? Will film vanish completely?
Film cameras are already vanishing from the scene rapidly in front of the advancing tide of digital technology, film has virtually disappeared altogether from the consumer market, and the majority of professionals have long converted over. What I would expect to see over the next few years is a dramatic shrinking of the Film market supply, down to perhaps one or two suppliers making one or two types of film, that perhaps you would need to order over the internet. Processing labs would also diminish to very few options, it may come down to posting your unprocessed films interstate or even overseas to have them developed. Everything from that point would be scanned and digitally printed (see this Post and this post for details), as is already the case now (apart from some smaller operators). The best simile would be the vinyl record industry when CDs became common, you can still buy vinyl, if you know the suppliers, and there are still many people who use nothing but.
See this related article about Depth of Field in medium format cameras.
You can read about my experience with medium format Hasselblad digital HERE, and the quandary of choice between the new Phase One XF-100 or Hasselblad H6D-100.
Awesome sky at the Pinnacles
I shot this image of the Pinnacles near Cervantes North of Perth in WA a few months ago, and basically forgot about it… That seems to happen a lot. I needed a couple of shots of the Pinnacles a few days back, so i opened the folder and had a play around and got this Read the rest of this entry »
A really BIG Photographic Canvas print!

I have mentioned this 4m Photographic canvas image a few times in previous posts, but i wanted it to be up on the wall before putting it on the blog, it seemed only fair that the client should see it first, especially since it has been so long in the making.

I was pretty excited when i got an order for a 4m image, a vertical one at that, i’d never printed anything so big and i was very keen to try it. I was confident the image would would print up well, it was shot on a large format panoramic camera, a Fuji GX 617 on a 6 x 17 cm piece of transparency film (Fuji Velvia), like most of the images in my gallery. It was then scanned at 3200 dpi and 16 bit on an Imacon 848 scanner to over 900Mb, so there was tons of fine detail and information to work with. The finished layered file came in at 2.9Gb… Thats a lot of hard drive space for one image.
My printer is an Epson 9900, which is 111cm wide (44″), so i can print an image of this format (3:1 ratio) to about 3m long… not big enough for this one. So i called my friend Paul Parin from Studio Red Dust, who has an Epson 11880, the big brother to my printer. The Epson 11880 can print to 152cm wide (60″) and with the right software and the right person driving it, for as long an image as you could want. Paul is very proffesional and really knows how to drive his printer, so the results were spectacular.

The timber for the stretcher frame had to be custom made, and Nigel from Bitches Brew Picture Framers, who shares the gallery space with me, had a few sleepless nights worrying about stretching this monster before clearing a space on the gallery floor and tackling the job.

My delivery van has a maximum length of 3m it can fit in the cargo area, so last Saturday i hired a truck and delivered this 4m long image to its new home, where Rob, from Master Art Display and myself put it into its final location.

Each of these images of the stretching and hanging of the 4m photographic canvas print were taken on the Canon 5D Mk II with the 17mm f4L tilt shift lens to keep the perspective and gain some unusual focal planes (click on the images for a closer look). The last image was not taken by me, since i am in the shot, but by Rob the Picture hanging expert, who also happens to be pretty handy with a camera.